Removing the old string
To change the string on the Ekdahl FAR you need to first loosen the old string by turning the tuning peg on the tuning block counter-clockwise using a tuning hammer. You could of course use a wrench but the conical design of the tuning peg will most likely mean that the peg will get marred, possibly creating issues after a lot of use.
Before removing the string, note that the front and back bridge have two guide slots cut into them, one on each end for different string thicknesses. These slots are cut at an angle and care should be taken that the bridges, which will come entirely loose when removing the string, do not rotate so the slot angle faces the wrong way. The slot angle on both sides should be facing towards the middle of the instrument, the reason for the slot angle is to minimize rattle and unwanted resonances in the string.
When all the windings of the string against the tuning peg have been unwound, unscrew the string retainer screw on the termination block and remove the string. Also, take note of the amount of turns that the string has on the tuning peg and try to replicate this when putting the new string on. If the old string has a string holding lug, remove it and keep it for future use.
Putting on the new string
When preparing to put on the new string you need to take note of the end type of the string. Certain types of strings, like cello, piano and viola have a loop end and the string retainer screw can simply be put through the loop to hold the string. Other types like guitar and bass strings have a ball-end and needs to use a string holding lug in order to be held in place. For ease of replacement, the string holding lug is simply whats known as a ring terminal, these can be bought pretty much anywhere and come in different sizes, a differently thick string may need a smaller or larger ring terminal depending.
When the new string has been fastened to the string retainer screw, screw it down to where it is close to the tail stock but not squashed against it. Lay the string across the front bridge, the string should have at least half of its body resting inside the guide slot. If the string is too thick, simply pull the bridge out and turn it upside down to reveal the other slot. Turn the bridge nut so it's roughly the same distance away from thew new slot as it were from the old and put the bridge back into the hole. Make sure that the slot angle is facing the middle of the instrument. Do the same exercise on the back bridge.
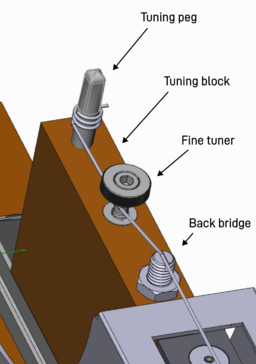
Try to lay the string across the instrument, over the back bridge, under the fine tuner and its guide ring (if it has one) and insert the loose end of the string into the hole of the tuning peg. A few things will have to happen at the same time now and it may require a few tries to get the hang of it. With the tuning peg still screwed a ways out of the block from having removed the old string, you now need to tighten the peg while making sure that the string does not slip out of the bridge slots or fine tuner guide ring and you also need to make sure to have enough slack on the string when you start that you can get a few turns of the string on the peg. Furthermore you need to make absolutely sure that you do not drive the tuning peg too far into the wood because if it bottoms out you could end up cracking the tuning block which will render the instrument completely unplayable. As a rule of thumb, at least 6mm / 1/4" of threads should be sticking out of the wood at all times. When you have reached the rough tuning of the string, the string should have a slight "v"-shape from the tuning peg to the fine tuner to the back bridge, meaning that the string should be slightly lower at the fine tuner than the other two positions. The reason for the "v"-shape is so that you have some room to de-tune the string downwards, thus conversely you also need to make sure that the fine tuner is not screwed all the way down when you do the rough tuning, because then you have no room to de-tune the string upwards in frequency.
Once the rough fastening / tuning of the string is done, check the height of the string from the case and the various other parts of the instrument. It should go without saying that if the string touches the metal case of the instrument the string will distort and create a lot of unwanted sounds, even if the string is above the casing when stationary, a strong resonance or hammer blow onto the string could make it swing widely enough to slap against the case which again will sound "bad". To set the height of the string you need to adjust the height of front- and back bridge by turning their respective nuts, these should ideally be set so that the string is at the same height from the metal case at both ends.
The height of the string will affect both the reach of the hammer, mute and bowing jack. An increased height could also make the string go against the upper mute, indeliberately muffling or muting the sound. All these parts may or may not have to be adjusted and the instrument will most likely have to be recalibrated using the software utility.